
1860s “Cornflower” Corset

Corset inspiration
I made my first corset back in 2017 as part of my first Civil War kit, and it was a steep learning curve. I used the Truly Victorian 1880 Late Victorian Corset Pattern which was a good starting point with clear instructions. To get the basics of corsetry down, I used the Sew Curvy’s DVD on the subject and Historical Sewing’s “The Victorian Corset Sewing Workbook” in addition to the pattern as reference materials on the techniques of corsetry such as how to insert a busk and grommets. Using these materials, I made my first corset, which was craftsmanship wise really great and something I am still proud of, but fit wise left much to be desired. I did not yet understand the importance of hip sping when it comes to corsetry, and therefore my corset dug into my hips the first time I wore it and made me very uncomfortable. Therefore when I got home, I ordered a ““ready-made”” one from Prior Attire and eventually got a custom one from Redthreaded, both of which have served me greatly in my historical costuming journey. Yet after two years of growth in my sewing skills and many hours of watching Youtube, I was inspired to devel once more into the realm of historical corsetry.
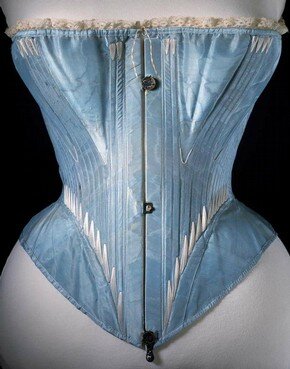
I was greatly inspired by this 1864 corset from the V & A as well as Redthreaded’s “Lydia” Atelier corset based on it. I did not want to worry about puckering, so I used a Kona quilting cotton in the same color as the extant as the fashion layer instead of a silk-like the original, and I used coutil as a strength layer.

How I curved my busk, I pushed out the busk at the waist then curved it back in to get that Victoiran “belly” look
I decided to start with Redthreaded’s 1860s Gorded Corset Pattern because I own two other Redthreaded corsets, and they fit me very well. After received my pattern, I made a mockup and was impressed by its shape and surprised for it closed completely in the back. This is a “bad” thing because historically, corsets should have a 2-3 inch lacing gap in the back; therefore, some adjustments were made. I took 1/4 inch out of both back lacing panels and 1/2 inch tapering to nothing at the waist from the front-side seam. After I made the adjustments, I cut out another mockup, and the fit was perfect, I had a good 2-inch gap in the back and my lacing strips with parallel to each other, so I knew that there was no unnecessary strain on any part of the corset. I also added a bone to the center back ““seam”” to add additional strength to the lacing strip. A deviance I made from the pattern is that instead of using a facing to encase the busk like the pattern called for, I sandwiched it in between the layer of fabric for the corset as outlined just because I like that method of busk insertion better. The final deviance I made from the pattern was I decided to use synthetic whalebone instead of the steel boning it called for. The reason I did this is that I have a pair of stays that were boned with synthetic whalebone, and the more I wore them, I more they formed to my body giving me a great shape. For this corset I also bent my busk to achieve more of an HA shape. Now that the mockup process was over, I was ready to start on the real deal.

Visual aid for how I put the layer together
(with the raw seams to the inside)
The first step was cutting out and marking the boning channels onto the fashion and strength layers paying special attention to grainline because it plays an integral part in corsetry. The next step was the busk insertion. I then sewed the front strength and fashion layer to the side fashion and strength layer separately so that the seam allowances (which were 1/4 inch) would be on the inside of the corset when finished. After that seam was sewed, the hip gore was added in a similar manner, followed by the back lacing strip. Then I sewed the boning channels using 1/2 inch boning casing on top of a one-inch twill tape that acted as a waist tape. After I sewed the boning channels, I hand-sewed self-made bias tape to the bottom and back of the corset, when finished I added the boning to all the channels. Then I sewed bias tape to the top of the corset in a similar manner. After all, the bones were in and bias tape finishing off the edges of the corset, I moved my attention to the task of adding the metal grommet (size 00) to the marks on the back lacing strip. After all the grommets were in, I used white embroidery floss to the corset trying to mimic the style of flossing on my inspiration piece. The flossing secured the bones in their channels. After that, I added a 6-yard laceing cord in a crisis cross pattern through the grommets adding "bunny ears" to the two grommets at the waist, which assist the wearer in tightening the corset when they have to put it on themselves.

Here is a photo for the lacing